TUTORIAL
PS2 Web Recomp explained and a step by step setup guide
Find out which PS2 games have been demonstrated in a browser and what you need to try them yourself. Includes the official project, local build steps, controls, saves and troubleshooting.
PS2 players and developers willing to install build tools and follow terminal commands.
Source revision c628ae8: Ubuntu 24.04 x86-64 and Apple Silicon macOS build instructions, local browser use, and current compatibility boundaries.
A local build attempt with clear checkpoints, a launch command, a memory-card backup procedure and a troubleshooting record.
Want to play Gran Turismo 4 or God of War II in your browser? PS2 Web Recomp's maintainer has brought both games into Chrome: races in GT4, combat in God of War II, with sound, controller support and saved progress.
To try it yourself, start at the official GitHub repository, which also includes the maintainer's demonstration. Download the tools, build a local game page from a disc image you own, then launch it in your browser. The first run needs installation and compilation; the project does not offer a ready-to-play online game page.
Start by checking your computer and build environment, then follow the installation and build steps. If you already have the generated web files, jump to launching the game.
What runs in PS2 Web Recomp today
As of October 16, 2026, the maintainer's main demonstrations cover Gran Turismo 4 and God of War II. Reported browser performance is 50 FPS for PAL GT4 at twice the internal resolution, and 60 FPS in God of War II combat at native resolution, using Chrome on the maintainer's integrated-GPU laptop. Project overview
For a first attempt, choose a game you own that already has a documented project result. Region, revision and scene can affect the outcome. Reaching a title screen is a useful checkpoint; gameplay, audio and saving still need checking.
The similarly named ran-j/PS2Recomp is a separate project targeting native PC ports. Every command below is for snuri00/ps2-web-recomp. Check the repository owner as well as the project name when looking for downloads.
Choose a build environment
You need build tools, a disc image of a game you own, and a browser that can run the generated page. Building happens locally. The first setup also downloads a toolchain, so allow network access and several gigabytes of headroom for the image, SDK and build cache. Extracting an archive consumes additional space.
| Computer | Route through this guide |
|---|---|
| x86-64 Linux | The package commands below target Ubuntu 24.04; other distributions need their equivalent packages |
| Apple Silicon Mac | Install the Homebrew tools, a newer Bash and LLVM, then join the shared steps |
| Windows | Upstream currently provides no native Windows build walkthrough; see the separate WSL note |
| Intel Mac, Linux ARM, phone or tablet | Do not apply these build instructions unchanged; touch controls alone do not establish an on-device build path |
Upstream documents builds on x86-64 Linux and Apple Silicon macOS. Start with an up-to-date desktop Chrome or Edge for playback. Platform notes
The project code uses the MIT license, but the repository includes no games. The maintainer asks users to supply images of games they own and keep generated game code and builds on their own computers. Do not upload the ISO, generated C++, or a game-containing web build to a public repository, file share or website. Project guidance
Step 1 Install the build tools
Run these commands in a terminal, one block at a time, pressing Enter to execute. Copy only the code, without adding a $ prompt. Password entry during installation may show no characters; type the password and press Enter. Stop at an error and resolve it before continuing.
Ubuntu 24.04
Open Terminal and check the operating system and architecture:
lsb_release -ds
uname -m
This branch is for Ubuntu 24.04 on x86_64. Install the tools:
sudo apt update
sudo apt install git cmake ninja-build clang-18 \
  libc++-18-dev libc++abi-18-dev build-essential \
  python3 curl unzip libvulkan1
Selecting Clang 18 avoids accidentally using an old compiler. Ubuntu 24.04 supplies the Clang 18 package. Keep your computer's working graphics driver configuration; this guide does not require replacing it.
Check the installation and select the compiler for this terminal:
git --version
cmake --version
ninja --version
clang++-18 --version
python3 --version
export CXX=clang++-18
Each version command should print a version. CMake must be at least 3.20. The export command normally prints nothing. Build configuration
If apt cannot find a package, check your Ubuntu release and enabled repositories. Do not paste these Linux commands into Windows PowerShell.
Apple Silicon Mac
Open Terminal from Applications → Utilities. uname -m should report arm64. Install Apple's command-line tools:
xcode-select --installIf they are already installed, continue. If Homebrew is missing, follow the official Homebrew installation instructions, including the PATH setup they provide, and check brew --version before proceeding.
brew install bash cmake ninja python llvm
export PATH="$(brew --prefix)/bin:$(brew --prefix llvm)/bin:$PATH"
export CXX="$(brew --prefix llvm)/bin/clang++"
bash --version
cmake --version
ninja --version
python3 --version
"$CXX" --version
Check that Bash is version 4 or newer. The system's Bash 3.2 is too old for the port script. PATH and CXX apply to this terminal session, so keep the window open throughout the first build. Child scripts must also find the newer Bash; changing only the outer invocation is insufficient.
Step 2 Get the source and prepare your image
Create a separate working directory
In the same terminal, run:
mkdir -p "$HOME/ps2-web-guide"
cd "$HOME/ps2-web-guide"
git clone https://github.com/snuri00/ps2-web-recomp.git
cd ps2-web-recomp
git switch --detach c628ae843209f6e4cef34ec04efb6267a1618882
git rev-parse --short HEAD
The last line should print c628ae8. This pins the source version used for these instructions and troubleshooting notes. A detached-HEAD message is expected. If the directory already exists, preserve it and use a new working directory.
Mac users need one compatibility step for this revision. Its compiler probe searches for versioned clang++ commands and can exit early on a host with only an unversioned command. Create a version-named link inside this tutorial directory, leaving the system compiler untouched:
mkdir -p .guide-bin
ps2_clang_major="$("$CXX" -dumpversion | cut -d. -f1)"
if [ ! -e ".guide-bin/clang++-$ps2_clang_major" ]; then
  ln -s "$CXX" ".guide-bin/clang++-$ps2_clang_major"
fi
export PATH="$PWD/.guide-bin:$PATH"
A community contribution documents the compiler-probe failure. The Ubuntu route already installs clang++-18 and does not need this workaround.
Put the ISO somewhere easy to find
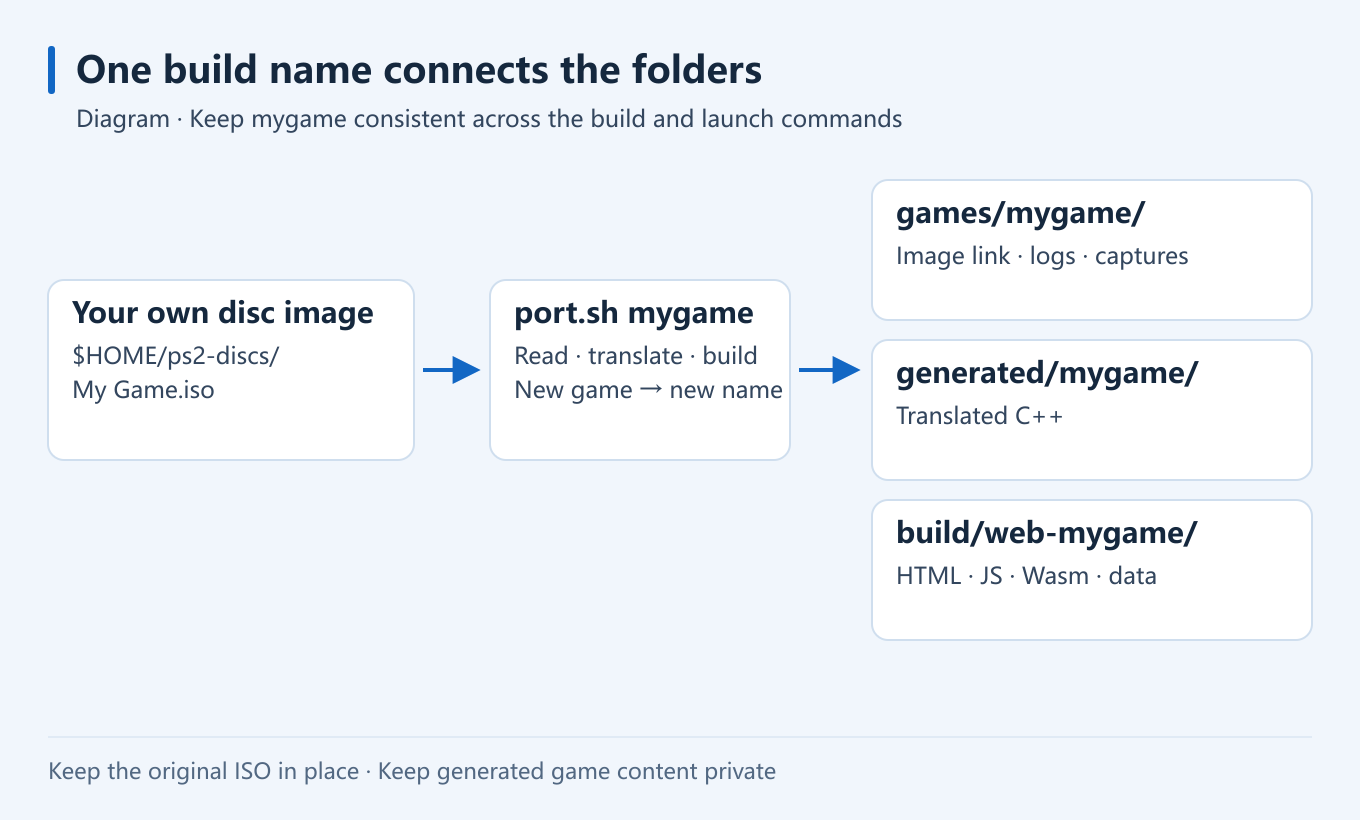
mkdir -p "$HOME/ps2-discs"In your file manager, copy your own ISO into the ps2-discs folder inside your home directory. For a file named My Game.iso, check it with:
ls -lh "$HOME/ps2-discs/My Game.iso"Replace My Game.iso with the actual filename, keeping the straight double quotes around the path. They protect spaces in filenames. Continue when the command lists the expected file and size. If it cannot find the file, check spelling, capitalization, extension and folder location.
An individual .iso keeps the first attempt easier to troubleshoot. The script also accepts ZIP and 7z archives containing an ISO; the latter needs a working 7z command. Renaming another image format to .iso does not convert it. Image handling
Step 3 Prepare the toolchain and build the game
Run setup on its own first
Make sure your current directory contains scripts, runtime and CMakeLists.txt:
pwd
ls
./scripts/setup.sh
On the first run, setup downloads the Emscripten SDK and wgpu-native and builds the two conversion tools. This revision selects Emscripten 6.0.11. You do not need to substitute the newest SDK manually. An existing EMSDK environment variable changes the SDK location. Setup script
Successful setup ends with == ready. Check the tools:
ls build/tools/eerecomp build/tools/vurecompIf downloading or compilation fails, keep the first error and the surrounding lines. Resolve that error before moving on; running the entire project with sudo is not a general fix.
Convert the image into a browser build
./scripts/port.sh mygame "$HOME/ps2-discs/My Game.iso"mygame is a short name for this build. Keeping it for your first attempt makes all subsequent commands match. Use a new name, such as mygame-pal, when changing the game or disc revision. Reusing the name while changing only the source path can leave the previous image link and exploration data in use.
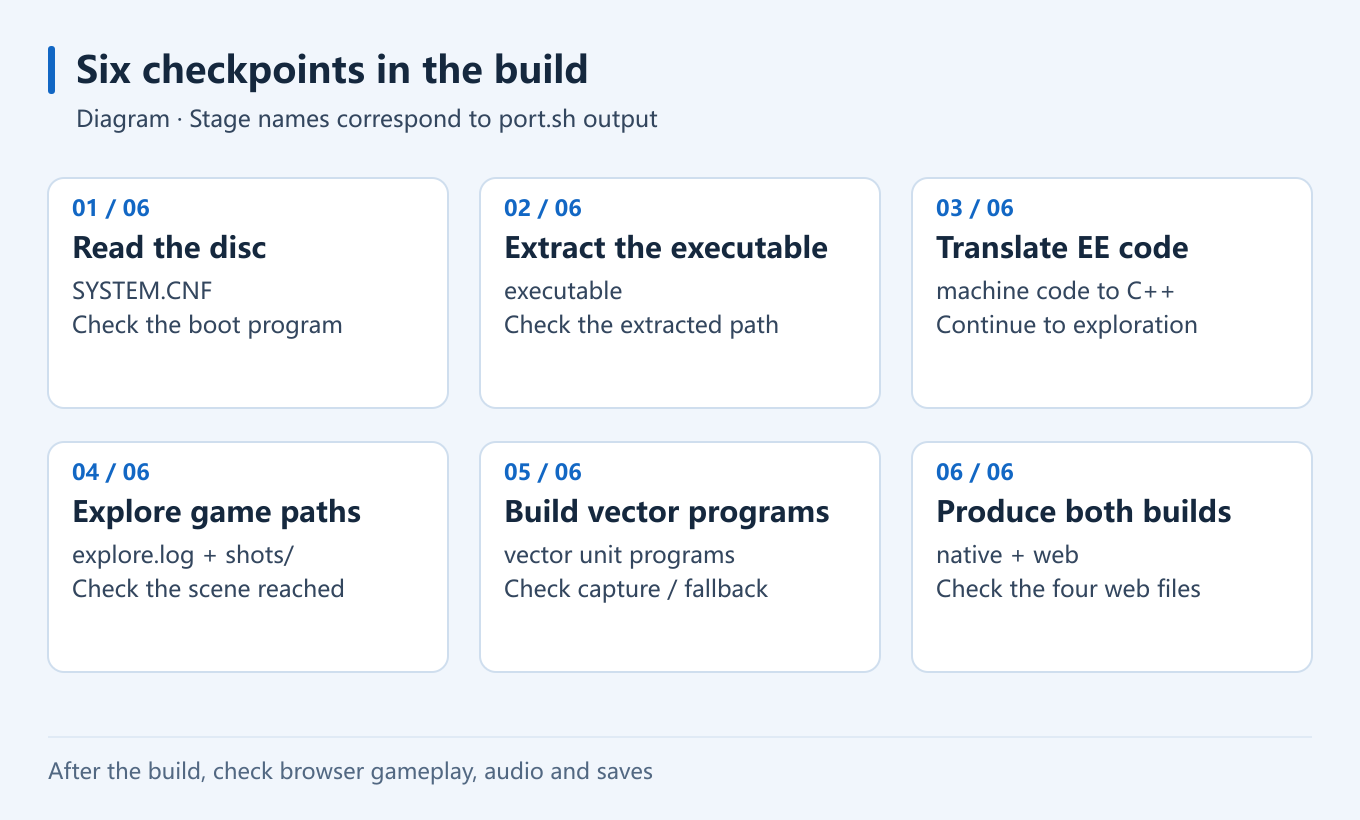
The port script prints six stage markers:
| Stage | Work in progress | Checkpoint |
|---|---|---|
[1/6] disc | Read the image and boot configuration | SYSTEM.CNF is found and a boot program is reported |
[2/6] executable | Extract the program to translate | A program path inside the game directory appears |
[3/6] machine code to C++ | Translate main-processor code | Translation finishes and the next stage starts |
[4/6] exploring | Run headlessly and discover indirect entry points | Round messages advance; logs and frame captures are written |
[5/6] vector unit programs | Compile recorded vector programs | A message about none being recorded can be a supported runtime fallback |
[6/6] builds | Build native and browser outputs | The final message begins Done. Serve it with: |
Exploration sends scripted inputs and does not necessarily open a game window. Some compiler output goes into a log file, so a quiet terminal alone does not establish a hang. First-time downloads, computer performance and the game affect the duration.
When the build finishes, check all four web files:
ls build/web-mygame/ps2web.html
ls build/web-mygame/ps2web.js
ls build/web-mygame/ps2web.wasm
ls build/web-mygame/ps2web.data
These come from the web build step. Also inspect games/mygame/shots in your file manager and read games/mygame/explore.log. A completed build and a playable scene are separate checkpoints.
Step 4 Open the local game page
From the project root, run:
python3 scripts/serve.py build/web-mygame games/mygame/disc.isoWhen the terminal prints serving and a local address, leave it running. In Chrome or Edge on the same computer, enter this in the address bar:
http://127.0.0.1:8620/Include http:// and use the address bar rather than a search field. Wait for Loading… to become an enabled Start button, then click it. Use this same address on future visits so your browser can find the same saved card.
Do not double-click ps2web.html or substitute a plain python3 -m http.server. The project's server supplies the isolation headers required for shared memory and the Range support used to read disc data. This pinned version listens on 127.0.0.1 by default; no router port forwarding or public hosting is needed.
If another application occupies port 8620, select a different one:
python3 scripts/serve.py build/web-mygame games/mygame/disc.iso 8621Then visit http://127.0.0.1:8621/. A different port creates a different browser storage origin, so export an existing card before moving.
Step 5 Play and keep your progress
Keyboard and gamepad controls
Clicking the page's Start button launches the runtime. The game's Start button is still Enter. Follow each game's own button prompts, particularly when circle is used to confirm.
| PS2 control | Keyboard |
|---|---|
| Start / Select | Enter / Backspace |
| Cross / circle / square / triangle | Z / X / A / S |
| D-pad | Arrow keys |
| Left stick | I / J / K / L |
| L1 / R1 | Q / W |
| L2 / R2 | 1 / 2 |
| Browser fullscreen | F |
After connecting a gamepad, return to the game page and press a controller button, then check the response. Begin at 1× internal resolution and increase it after normal play works. Changing resolution reloads the page, so save in the game first. Interface and input implementation
Save and export the memory card
Use the game's own save system first. If it asks to format a new memory card, follow the in-game prompts. The page persists the card in browser storage. Before leaving, click Export card and keep the downloaded .ps2 file in a clearly named backup folder.
To move to another browser, port or computer, first export any card already in the destination. Then use Import card to select your backup. Import replaces that card and reloads the page. The current implementation expects the raw layout of an 8 MB PS2 memory card, checking for a file size of 8,650,752 bytes. An arbitrary individual-game save format will not work. Memory-card code
Keep using a regular browser window, the same browser profile and the same address. localhost and 127.0.0.1 are different hostnames; ports 8620 and 8621 are different origins. Private browsing and clearing site data also affect persistence. If multiple games use one address, export and label their backups carefully.
Close it and return another day
After saving in-game and exporting your backup, close the game tab. In the server terminal, press Control+C. When the command prompt returns, the server has stopped.
Next time, run only:
cd "$HOME/ps2-web-guide/ps2-web-recomp"
python3 scripts/serve.py build/web-mygame games/mygame/disc.iso
Open the same browser address. You do not need to reinstall the SDK or rebuild the game every day. Keep the original ISO at its existing location: the project's disc image may be a link to that file.
Troubleshoot by symptom
Separate environment failures from compatibility gaps
command not found: identify the command named in the error and return to that platform's installation step. After opening a new terminal, check that PATH still points to the installed tools.bad substitution, or Bash is still 3.2: macOS may still be selecting its old system Bash. Repeat the Homebrew PATH setting and checkbash --version.no C++ compiler here has <format>: check the compiler and standard-library installation. On Ubuntu, verify Clang 18 and libc++; on Mac, check LLVM and Apple's command-line tools.- Toolchain download fails: preserve the actual GitHub or SDK download error. Restore connectivity and retry
setup.sh; do not disable TLS checking or use an untrusted build package. - Missing ISO or
SYSTEM.CNF: check the path, image format and contents. Renaming the extension will not convert a file. Use a fresh build name after changing to a corrected image. - Compilation stops: locate the first error and inspect
build/native-mygame/ninja.log. Resolve the reported dependency; if the OS killed compilation for memory pressure, free resources before retrying. - The page says
Unsupported browser: read its list of missing features, update desktop Chrome/Edge, and check that you are using the project server. - The page is unavailable, or a resource returns 404: confirm that the server terminal is still running. Start it from the project root, check the port, and verify the four web outputs.
- Menus work but 3D is extremely slow: look for a
software rendererstatus. Check WebGPU, graphics drivers and 1× resolution; software fallback is unsuitable for demanding 3D. - The game stops in the same place: look for
[sys] unhandled syscallor[iop] missingin the exploration log. Preserve the game revision, frame capture and log; repeatedly reinstalling tools will not fill a runtime compatibility gap. - Picture without sound: confirm that Start was clicked, check tab and system volume, then inspect game or audio errors. Persistent silence can also be a game-compatibility issue.
- A save disappears: check whether the browser profile, hostname or port changed. Return to the original origin and export, or import your backed-up
.ps2card.
The page checks shared memory, JSPI, WebAssembly exception handling, tail calls and SIMD. A positive WebGPU check alone does not establish that every runtime requirement is present. Browser capability checks
For Linux browsers reporting no WebGPU, upstream suggests the experimental settings chrome://flags/#enable-unsafe-webgpu and chrome://flags/#enable-vulkan. If needed, change these only in a dedicated test profile, restart and check again, then restore the settings afterward. Do not disable the sandbox or site isolation. Upstream browser notes
Check scripted inputs when exploration stops at a menu
Default exploration sends Start and cross inputs. For a game expecting circle, a new build name can be used to try another sequence:
./scripts/port.sh mygame-circle "$HOME/ps2-discs/My Game.iso" \
  --frames 7200 \
  --press 300:start --press 600:circle --press 900:circle
The number before each button is an exploration frame. Custom --press arguments replace the default sequence, so include all required inputs. This example explores a different menu path; it cannot implement missing hardware behavior. Inspect games/mygame-circle/shots and its log afterward. Port options
Use the troubleshooting record template when asking for help. Include the OS, source revision, game region/revision, exact command and first error. Remove private paths before sharing, and do not attach an ISO or generated game code.
Windows and WSL
Windows users can inspect an existing setup in PowerShell with wsl --status and wsl --list --verbose. To install Ubuntu, follow Microsoft's WSL instructions; installation can require administrator privileges and a restart. Enter Ubuntu before using this guide's Linux commands.
Treat WSL as an exploratory route here. Native exploration, the graphics backend and browser access need separate checks, and upstream does not currently document a complete Windows/WSL success path. A file called PS2Recomp.exe is not this project's Windows edition. A demonstration running in Windows Chrome also does not establish that its build was produced on Windows.
How a PS2 game reaches the browser
The conversion begins with the game's machine code. A recompiler follows control flow and expresses main-processor operations in C++. Emscripten then builds the generated code and runtime into WebAssembly. The browser executes that program while the runtime supplies the system calls, memory and hardware behavior the game expects. Build configuration
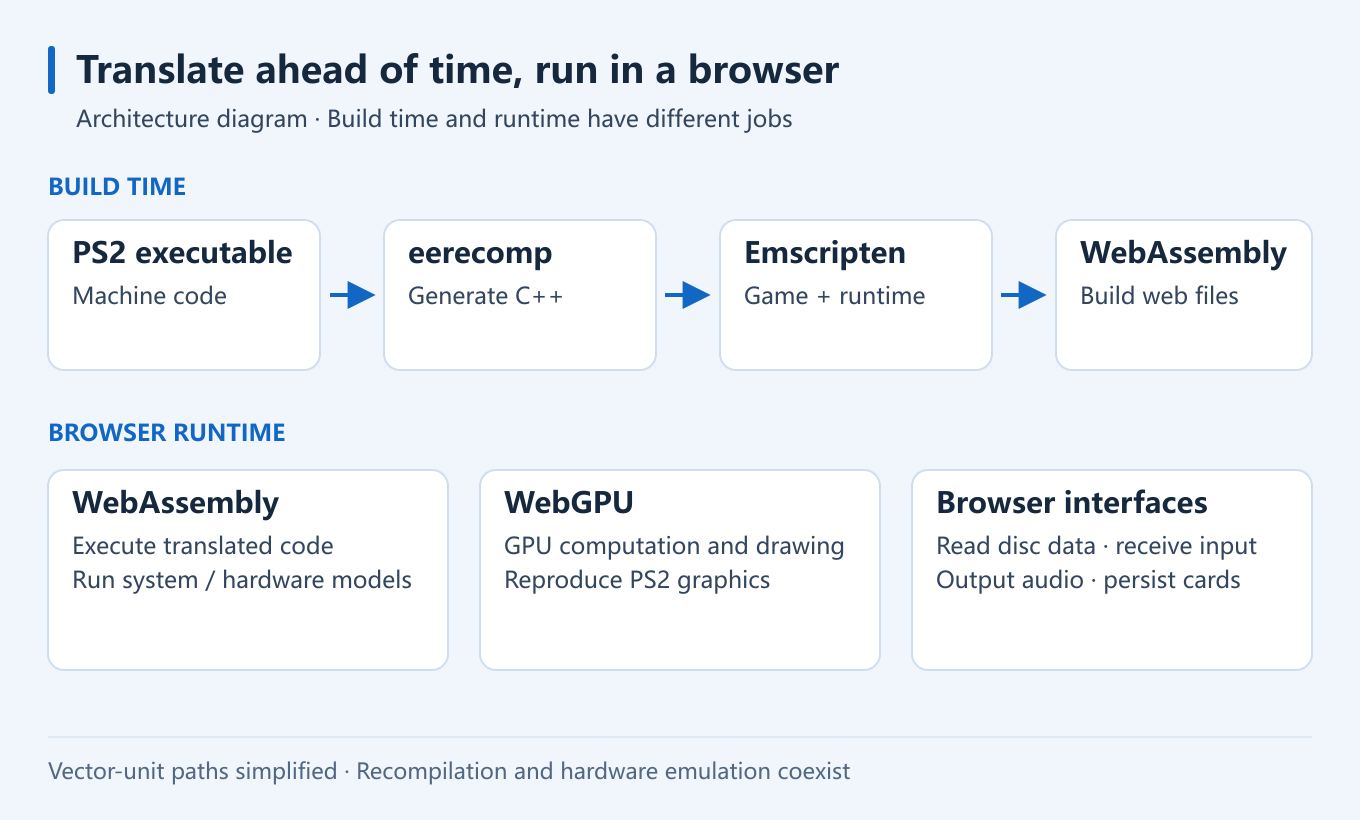
WebAssembly provides computation and execution; WebGPU exposes GPU computation and drawing. The project uses compute shaders to reproduce the PS2 graphics chip's drawing behavior, alongside emulation of other components. Static recompilation and hardware emulation therefore coexist in this architecture. The WebAssembly goals and WebGPU documentation explain the underlying browser facilities.
Static analysis can miss indirect targets, so the port script runs exploration, records new entry points and translates again. Exploration covers a finite set of scenes; later parts of a game may encounter another path. That is why the walkthrough separates build completion from playable behavior.
Performance work also targets specific costs. The maintainer describes reducing GPU compute dispatches from roughly 650 to 80 per frame by reorganizing uploads while preserving dependencies. Avoidable batch splits consume frame time without adding anything to the image. Optimization notes
What to watch next
New games test new paths. A community Kingdom Hearts II proposal reports boot, menus and the opening cinematic while leaving background music and later gameplay as follow-up work. It remained unmerged when this guide was checked. Community port record A separate GT3 proposal is experimental too; it should not be counted as main-branch compatibility. GT3 proposal
For players, easier setup, clearer compatibility records and reliable save handling will make the project more approachable. For developers, the interesting work includes code translation, browser resource and thread handling, and the new faults exposed by another game.
If this makes you want to build an original game that can be shared through a link, continue with making your first playable game without programming experience. If you already have a prototype, debugging a game with screenshots and reproduction steps covers the next practical problem.
Sources (16)
- PS2 Web Recomp — project overview and demonstration
- PS2 Web Recomp — port.sh at c628ae8
- PS2 Web Recomp — setup.sh at c628ae8
- PS2 Web Recomp — build_web.sh at c628ae8
- PS2 Web Recomp — local HTTP server at c628ae8
- PS2 Web Recomp — controls, browser checks and memory-card handling
- PS2 Web Recomp — CMake build configuration at c628ae8
- PS2 Web Recomp — compiler probe at c628ae8
- Community PR 13 — Kingdom Hearts II exploration and compiler-probe fix
- Community PR 11 — experimental GT3 bring-up and remaining validation
- ran-j/PS2Recomp — separate native-PC recompilation project
- Homebrew — installation
- Ubuntu 24.04 — Clang 18 package
- Microsoft — install Linux on Windows with WSL
- WebAssembly — high-level goals
- MDN — WebGPU API
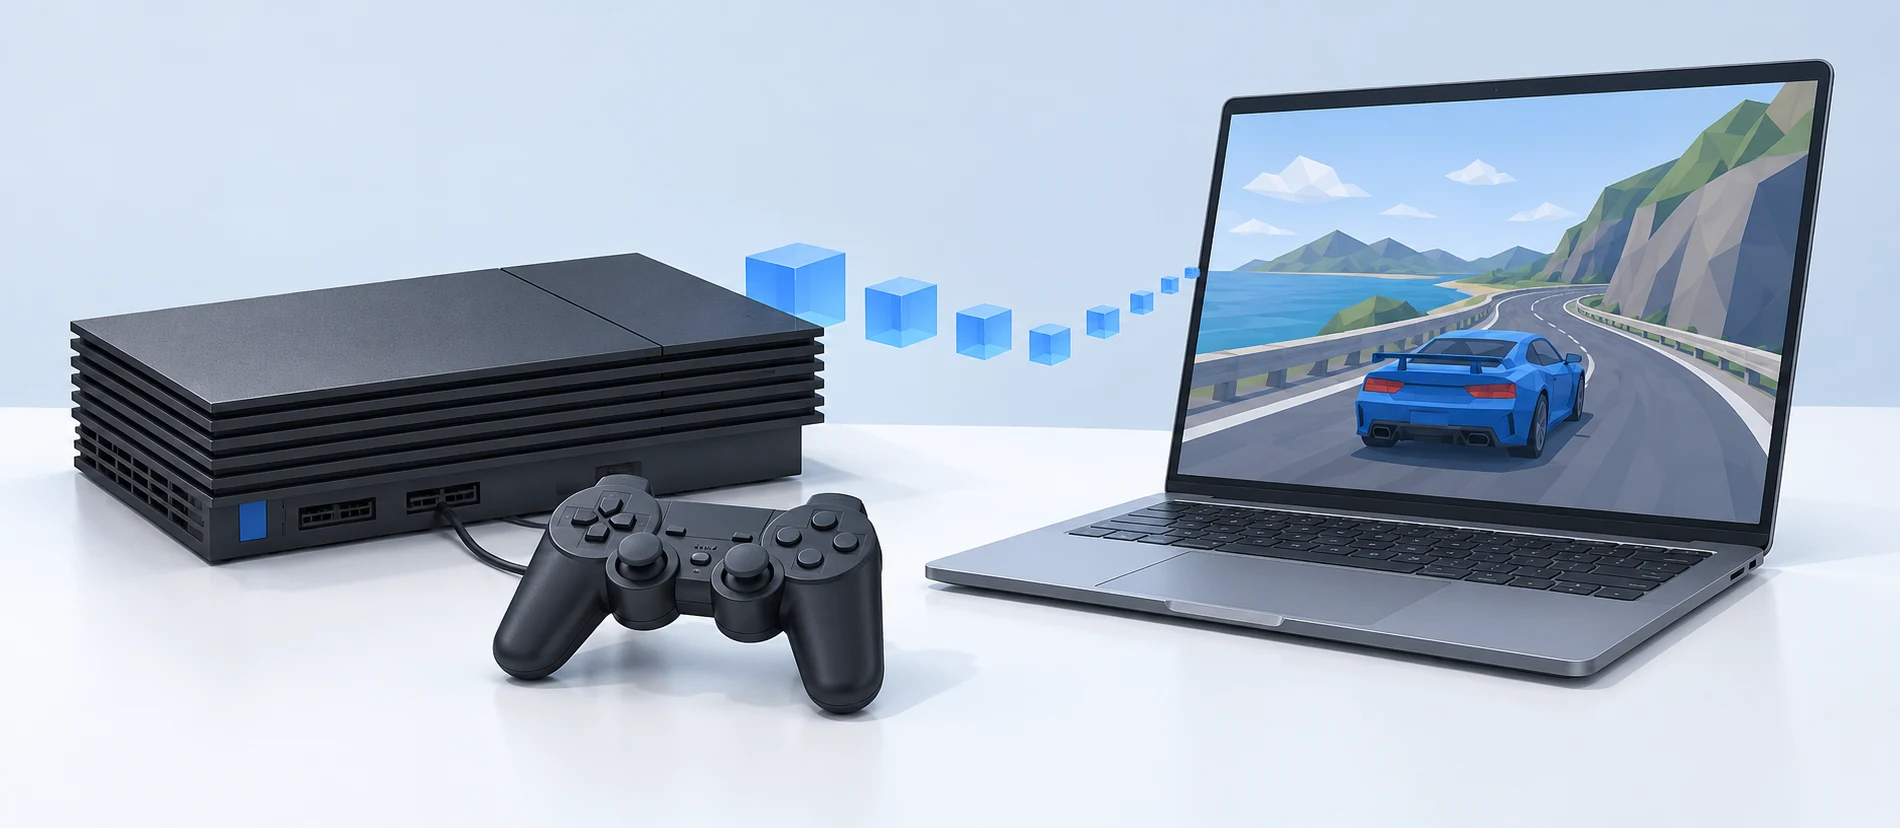
Based on upstream source and public project records. Performance figures are the maintainer's reports; diagrams and the conceptual cover are original editorial illustrations.